I was out of parish for work last week and this week as well and this will be for a duration of six weeks. I did however travel the 168 KM home by driving on Friday afternoon for nearly 2.5 hours. I did not get much work done on the Fairfield as I had some writing assignment for the real job.
I nonetheless managed to complete the crown moulding in the entry hall as well as the window moulding on the side wall. I even attempted the moulding around the entry doorway but this did not go well and I had to remove it and as a consequence the wall paper was damaged. I was not too disheartened as this can be easily repaired and because of the location of that wall, the repairs will not be very visible so any negative impact should be minimal.
Monday, 16 May 2016
Wednesday, 4 May 2016
UP WITH THE WALLS
All the walls are now up with the exception of the side wall of the extended entry. I will need to finish the entry space entirely before I can put this wall in. I have so far done the wallpaper and the ceiling paper, next I will install the crown moulding. I will thereafter install the floors, the staircase, the doors, the window and door mouldings and finally the light fixture which I will run across the floor above.


VIEW OF THE ENTRY HALL LOOKING THROUGH THE SIDE OPENING MODIFICATION AND THROUGH TO THE ARCH INTO THE PARLOUR.

THE FRONT DOOR OPENING AND A VIEW OF THE PARTIALLY CONSTRUCTED STAIRCASE.

THE MASTER BEDROOM ABOVE AND THE PARLOUR/LIVING ROOM ON THE GROUND FLOOR
The 2nd
floor houses the master bedroom a guest bedroom and a bathroom. On the second
floor I have constructed a Bay window in the guest bedroom on the right side of
the house, It had bothered me that there was no window in this room. This bay
window overhangs the dining room windows on the ground floor and creates a nice
architectural feature. I have also gained the opportunity to construct a window
seat in the guest bedroom. Of course I am pondering where the bed will fit in
this room but I will cross that river when I come to it.

THE GUEST BEDROOM AND THE DINING ROOM WITH WALL PAPER.
On the second floor instead of doing a roof around the tower, I will make a walk out porch instead, I will also do little balconies above the ground floor bay windows instead of roofing. I have however retained the same dimensions of the upper tower and converted the windows to doors.

THE UPPER PORCH/DECK AND THE ENTRY PORCH

THE KITCHEN BAY AREA AND A GLIMPSE OF THE DOORWAY LEADING FROM THE ENTRY INTO THE KITCHEN.
Sunday, 1 May 2016
SMALL PROJECTS - BIG IMPACT
I have not posted anything in awhile because I have been really busy at my real job. I have however managed to do a few essential projects and am making slow progress on the dollhouse. I have laid down the yellow sandstone flooring in the kitchen and grouted it. I think it looks really authentic, but then it should because these are real stone tiles. The tiles do no look as "yellow" as I anticipated but they look really good nonetheless.


 The wall paper in the guest bedroom is in, it is a nice shade of blue. I have painted the bow window and that will be installed as soon as I figure out what to do for "glass" because unfortunately none was supplied with the window kit. I think a nice sturdy piece of plastic will do the trick. Come to think of it I do recall saving a really nice piece I got in a package/box it would be perfect if I could only find it,

 .
.


As you can see in the above photo, I did manage to get the front wall extended so as to enlarge the entry hall and that went quite well, I have also prepared the side wall that will enclose the space and also made a window opening in that wall. There should therefore be lots of light getting into the entry hall; the window will also provide better perspicacity so one should be able to view the staircase, the kitchen door and also have a view into the parlour through the arched opening.


I was trying to spiff up this ceiling with gold painted fretwork but that did not go very well.I have removed the fretwork and sanded the areas back to smoothness. I am going to repaint the ceiling perhaps another shade of purple and see how that goes.
 .
.
I like how the wall and ceiling paper in the dining room complement each other, All that is needed to complete the ceiling is moulding and the chandelier.

I was of the view that the moulding I had used to dress the staircase previously, was way too heavy, So I removed it and redressed it with lumber that I feel is more to scale. I need however to highlight the trim in another colour or stain so that it stands out.
Monday, 18 April 2016
WALL PAPERING
I have not posted anything for awhile but this does not mean I have been idle. On the contrary I have made much progress mainly in the application of siding and wallpapering. I have concentrated my efforts on the ground floor thus far and I need to figure out the lighting procedure. I think I will stick to round wiring and feed the cord for the fixtures through the fireplace apparatus.


 This is the dining room ceiling


The above pictures are my efforts in crafting a drop ceiling for the Parlour. I had cut the cardboard and applied white glue to the cardboard surface to seal it and to prepare the surface for painting. I also dressed the cut outs with 1/8" square trim. I then used wood filler to fill gaps and jagged edges which I carefully sanded to a smooth finish. At this point it looked really good and I intended to highlight the cutouts in a gold paint, Unfortunately things did not go as planned, the bottle of gold pain upturned and spilled over the entire surface of the ceiling, so thick in some areas that it looked really unsightly so I had to scrap the whole project.

This is the failed project.


This is the painted parlour ceiling, I had planned to super impose the drop ceiling over the purple paint, BUT ALAS! AND ALACK! THE BEST MADE PLANS CAN GO AWRY,

THE DINING ROOM


FURNITURE FOR THE PARLOUR AND THE CHINA CABINET FOR THE DINING ROOM.
Wednesday, 23 March 2016
MORE FLOORS ... and THINGS
I had managed to do the floor for the two (2) upstairs rooms they came out quite well if I do say so myself.

 |
| Flooring for the master bedroom |
 |
| Flooring for the guest bedroom |
I have spruced up the staircase lower banister by adding some moulding trim but not sure I like it. Since I will be adding a second staircase up to the attic, I was thinking that the railings on both should be uniformed. In that case I will have to discard the railing that came with the kit because I am unable to obtain another of its kind and unable to replicate it myself. I guest it will resolve this somehow soon.

Saturday, 19 March 2016
FLOORING
I love the look of parquet floors and thought they were eminently suitable for a Victorian house. Consequently I purchased a number of patterns from the Brodnax Prints line. When the items arrived and I viewed the packets and the tiny pieces of flooring; the task appeared daunting.I kept postponing the task and therefore the building process could not proceed. I happened upon a UK store named Malcolm's Miniatures and discovered a wonderful item called parquet floor frames. The package consists of a pre-built frame all divided into 1" squares and double sided sticky paper to lay the floor onto. All I had to do was lay out the perfectly squared frame and form the patter within it. In no time I had built the Living and Dining room floors.

I have now installed the fireplace and the dividing wall between the dining and living rooms. This process also included attaching the side walls and the ceiling/floor between the first and second floors. I am now waiting for the glue to set and cure,


I think I will now tackle the kitchen ceiling, with the "logs" I have in mind but I don't know how this will go as yet.

 |
| From left to right; the living room and dining room floors |
I have now installed the fireplace and the dividing wall between the dining and living rooms. This process also included attaching the side walls and the ceiling/floor between the first and second floors. I am now waiting for the glue to set and cure,


I think I will now tackle the kitchen ceiling, with the "logs" I have in mind but I don't know how this will go as yet.
Saturday, 12 March 2016
OF WINDOWS AND DOORS
I collected my windows and doors yesterday from the Post and as soon as I opened the box and viewed the contents my heart plummeted, The windows I opted for were the Grandt Line in G scale; but these are way too big for the existing openings. The doors on the other hand look way too small.
Since I spent the princely sum of US $75 for doors and windows I cannot afford to not use them. The solution of course is to make the openings larger. Today I spent the most painful and frustrating day enlarging the window openings. I also had to repeat this exercise for the internal door openings because these were also way too small for the doors I purchased for them. I get the feeling that all 'G' or 1/2" scale are not uniformed.
These are the troublesome windows and the internal doors:

My fingers are quite sore and I did get a few nicks on my right thumb from the knife I used to neaten the edges of the altered window openings.
I have started to acquire a few pieces of furniture and this I realize is going to be an expensive undertaking. Since I do not have the skill or tools to make high end furniture I will have to hunt down every bargain I can find on the NET,
Sunday, 6 March 2016
WORKING ON A RAINY WEEKEND
This weekend we were blessed on the rock (aka JAMAICA)with much needed showers from above. Of course this is the kind of weekend that inspires mini work; or should anyway. I did get some work done, nothing exciting but some wall alterations to the entry hall that were long over due,is now completed. There are no pictures as yet but coming soon. I have also taken some decisions in relation to the allotment of space on the 2nd floor and attic.


On the 2nd story instead of doing a roof around
the tower I will make a walk out porch instead; I will however keep the same
dimensions of the roof and convert the window on the right to a door. I will
also change out all the windows and doors to better quality ones. I have some Grandt Line doors and windows coming in the mail.


The 2nd floor houses the master bedroom, a guest bedroom
and a bathroom.I have now constructed a Bay Window on the guest
bedroom on the right backside of the house. It had bothered me that there was no
window in this room. This bay window overhangs the dining room windows on the
ground floor and creates a nice architectural feature. I have also gained the
opportunity to construct a window seat in the guest bedroom. Of course I am now pondering where the bed will fit in this room but I will cross that river when
I come to it.
What to do with the Attic? This is prime real
estate that I cannot afford to waste; however the sloping ceilings are a challenge;
but by the time I get to that phase of construction I will have devised a plan.
I intend to have a princess (little girl’s room) and a nursery to the
rear of the attic. The tower area depending on how I adjust the roof line will
either be an adjoining dressing room for my princess or a reading nook
(undecided). The baby’s room will be in the Bunny Parade décor, I have already
bought paper and rug and I am now trying to source some less expensive nursery furniture (SIGH). The area above the 2nd floor bath will
probably be an open library/sitting nook.
I also did some kit construction, the plate rack and sink for the kitchen; and here they are:
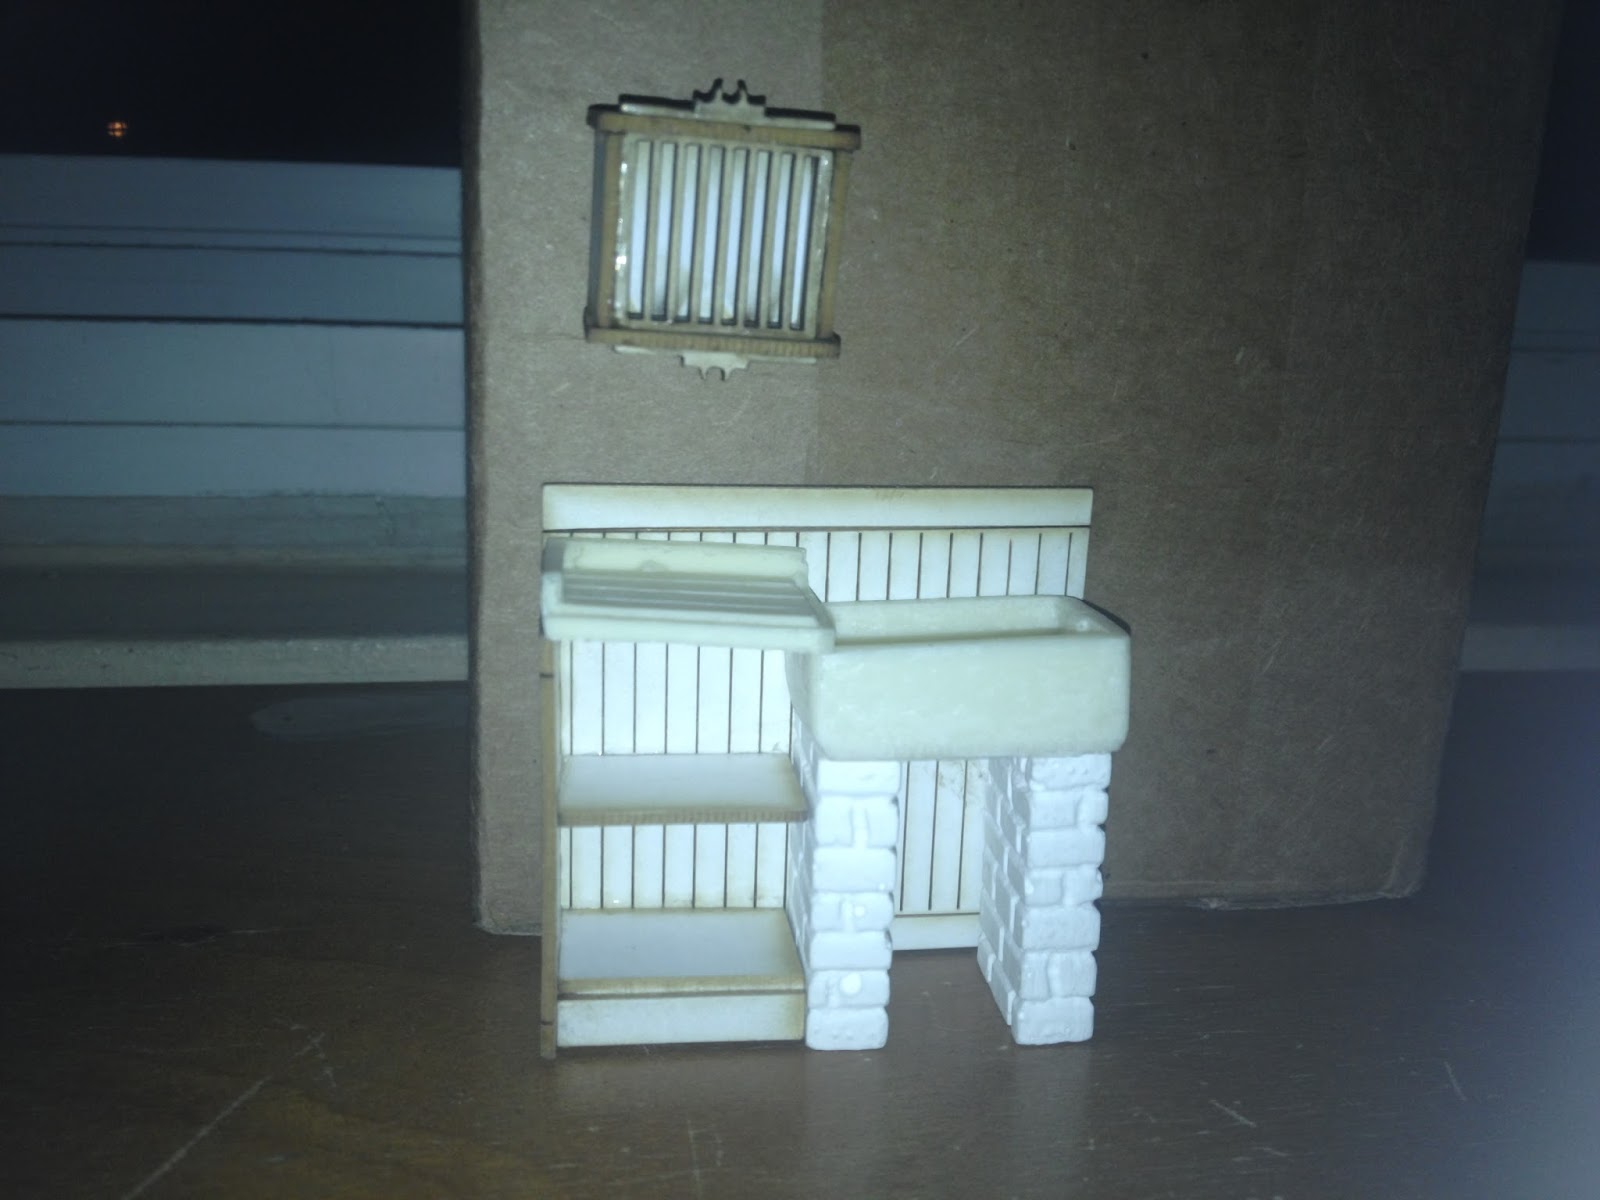
These are kits I purchased from Petite Properties Ltd.(UK); I like them because they are unique and reasonably priced.
I also did lots and lots of shopping, this means I am going on a diet because I have spent all my months worth of lunch money on little things.
Sunday, 28 February 2016
ANOTHER ALTERATION
I decided that I would like to have a recessed alcove for my stove and the best place to do this was the back wall of the kitchen behind the stairs. I measured the height and width of the stairs and it seems that I could get an inglenook type of space under the stairs. I used my Dremel tool to poke holes until I could use my craft knife to cut out the wall opening. I sanded the side and top of the opening until smooth and square; then I dressed the top and right side of the open space by trimming them out with wood strips.

I used wood putty to fill out any spaces and chips around the opening. Aaarrrgh1111
 This is my stove in the making, I used crazy glue to affix the sides and top of the kit to the front section, All I need to do now is spray paint the whole thing black and attach the door and the pipe.
 |
| The pencil markings on the wall is the outline of the Hearth |

 |
| This is the fireplace hearth. |

Thursday, 25 February 2016
THE STAIRS
On the ground floor I will extend the entrance wall to edge
of porch that is to the left of the front door; this of course will result in a
bigger entrance hall. I will then insert an entrance door in the centre of the front wall (extended tower wall). I will keep the 2nd door
which originally led lead from the outside of the house; this will now lead
from the entry hall to the kitchen. This makes more sense to me because realistically it is easier to access the kitchen this way. I will install
walls that will enclose that space completely so that it becomes a proper room. The stairs will be reoriented so as not to
crowd the livingroom/parlour entrance.
I have now done some more work on my Fairfield project and I am in the process of positioning the staircase between the central wall and the kitchen wall. I had reoriented the direction of the stairs and increased the Entry Hall and that is going nicely.
I have now done some more work on my Fairfield project and I am in the process of positioning the staircase between the central wall and the kitchen wall. I had reoriented the direction of the stairs and increased the Entry Hall and that is going nicely.
Many items have arrived including wall paper and light fixtures. On the weekend I will concentrate on assembling my stove, sink and fireplace inserts and if time permits I am going to work on the kitchen floors.


A mock up of the walls and a dry fit of the staircase


This depicts the extension of the Entry Hall. The kitchen door will now be accessed from inside the Entry Hall instead of externally. The Porch has been reduced by 50% but I will make up for this by converting the porch roof on the second floor to a proper porch; accessible by a door in the tower.

View of stairs from the living room
Saturday, 20 February 2016
GETTING STARTED
Well; this morning I again opened the box, I had intended just to take a tiny peep, of course I could not help myself and soon I was popping the little parts from the plywood sheets.


I was so gung-ho that I completed the base; made an altered staircase and fitted and glued the central fireplace stack together.


This is the completed base
 The fireplace stack looking like a trussed up turkey
 I have cut the stair case banister off the living room arch opening, it looked too ridiculous there. I have decide to turn the stairs to the left so that it begins to ascend beside the kitchen doorway.

Consequently I plan to expand the entry hall; the left side of the porch will now be enclosed as per the pencil line above, as a bonus the kitchen door will now open from the entry hall instead of from the exterior of the house. This of course makes better sense to me as a layout. I have already cut the left tower wall at ceiling height and will cut 2 short walls to extend the the front tower wall as also to provide a side section to enclosed the re-purposed porch now entry.


I decided to get the base started so I sanded and prepped and glued


Subscribe to:
Posts (Atom)